Chicken Pot Pie

IMG_7127

I found this chicken pot pie recipe from a blog called Well Plated while I was looking for something to make for dinner one night. It’s since become one of my go-tos when I’m not sure what to make, since it really is so easy and the ingredients aren’t hard to come by.

One thing that drives me absolutely nuts when looking for online recipes is the lengthy stories about the author’s husband’s best friend’s grandma and how this one recipe is just so super special because grandma brought it over from the old country. But look! The author made it healthy! I absolutely hate scrolling through that drivel. I’m just going to post the recipe here and include additional notes on what I did while making it. I’ll also reword and reorganize some of the steps for clarification.

Ingredients:

  • 1 tablespoon extra-virgin olive oil
  • 10 oz cremini baby bella mushrooms
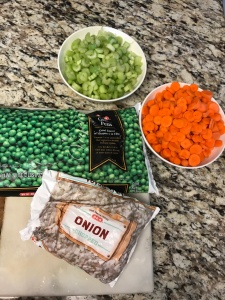
  • 1 cup diced carrots
  • 1/2 cup diced celery
  • 1 1/2 teaspoons garlic powder
  • 1/2 teaspoon salt
  • 1/4 teaspoon black pepper
  • 1/4 cup all purpose flour
  • 2 cups cooked and shredded boneless, skinless chicken breast
  • 2 cups unsweetened almond milk
  • 1/2 cup frozen peas
  • 1/2 cup frozen pearl onions
  • 1 tablespoon chopped fresh thyme
  • 1 prepared pie crust
  • 1 egg

Steps:

IMG_8197 1. Preheat your oven to 425 degrees. Lightly spray a 9 inch pie dish with cooking spray. I found a round pie pan at H.E.B. (a Texas grocery store). It looked more shallow than I thought it should be but it ended up being fine. Gather your veggies and chop them.

IMG_81982. Heat a large Dutch oven or similar deep, heavy bottomed pan over medium high heat. I just used a large pot. Add the oil to the pan, once hot, add the mushrooms and cook for 8 minutes, until mushrooms are beginning to brown, stirring occasionally. Add the carrots, celery, garlic power, salt, and pepper. Cook until the mushrooms have browned more deeply and the carrots begin to soften, about 3 additional minutes. The first time I made this I used mushrooms, but neither my husband nor I really loved it. We felt like it took away from the chicken pot pie flavor and was too earthy. I usually do love mushrooms-just not in this dish! I’ve gotten much better at not measuring exactly. I just used about half a bag of baby carrots, and several stalks of celery. Make sure you are cooking long enough to soften the carrots and celery, I tend to want to rush and sometimes they end up too crunchy.

3. Sprinkle the flour over the vegetables and cook for 2 minutes.

IMG_82014. Slowly pour in the almond milk, adding a few splashes at a time, stirring constantly. Bring to a low boil, scraping any brown bits from the pan. Continue to let bubble until thickened, about 3-5 minutes. I divided the almond milk into 1/4 cups and stirred those in individually. It does take a little bit to really bubble up and thicken so go by your pan, not by the minutes on the clock-something that I’m still working on! Also, make sure you get regular, unsweetened almond milk. I accidentally used unsweetened vanilla almond milk while cooking once and it completely ruined the dish.

5. Stir in the chicken, peas, onions, (I used regular, not pearl onions, and I just got frozen onions because they were cheap and already diced, and I’m lazy.) and thymeThe fresh thyme is good, but, unlike the original recipe, I found that it wasn’t totally necessary-it still tasted good with or without it and to me it wasn’t worth the (small) extra effort or cost to buy fresh thyme. The author also has a wonderful, quick, way to get shredded chicken if you don’t have time, or forget, to set it in your crock pot. Basically, you boil the chicken until it’s cooked (it doesn’t take long!) drain the water, and shred it. I’ve heard that a hand held blender does the job, but I personally find that too messy and stick to the two fork method. Here is the link. 

6. Spoon the chicken mixture into the prepared pie dish.

IMG_8205       IMG_8204

IMG_8200IMG_82077. Roll the pie dough into a circle large enough to cover your dish. I make sure that some hangs over the edge so that the inside doesn’t bubble out into the oven. Separate your egg yolk from the white and then brush the edges of the pie dish with the egg white. You can use your finger if you don’t have a brush. Just make sure to wash your hands thoroughly. Lay the dough over the top of the pan so that it hangs about 1/2 inch over the sides. Gently press the dough so that it sticks on the edges, then brush the remaining egg white over the top. Cut 3 slits into the dough.

8. Bake for about 25 minutes until the crust is golden brown.

IMG_8208  IMG_8209

My pie doesn’t always look perfect, but it tastes delicious! I need to work on my slit-cutting skills. At first glance I thought that this would be a difficult dish to prepare, but it really wasn’t that bad. The most time consuming part for me is chopping the vegetables. I love this as a quick, easy, dinner that is healthy and filling. It makes for good leftovers too. This will be perfect in the fall and winter. (Here in Texas, however, I’ll just have to crank the AC while cooking.)

Ask Again, Yes

ask again yes

I read this book earlier this summer and I couldn’t put it down! Ask Again, Yes, by Mary Beth Keane, tells the story of Kate and Peter, two kids who grew up together in the suburbs outside of NYC. Both of their fathers are newly sworn in police officers who end up moving onto the same street to start their families. Readers get to know life through Kate and Peter’s parents, and eventually, through Kate and Peter.

This book spans several decades and readers get to see Kate and Peter grow up and how their relationship changes. Shifting perspectives describes events from different character’s points of view. While this has been a fairly popular trend recently, I still enjoyed getting to see events through different eyes. Ask Again, Yes relies on characters to drive the plot. I got to know each character and wanted to know what happened to them  next and how their life turns out. I enjoyed the fact that it spanned such a long period of time because I was so invested in the characters and their lives; this was a story of how ordinary lives unfold. I could relate in many ways to how the characters friendships grew and how they all loved each other. Part of what makes this book great is the ordinary-ness of it, you will recognize these characters and get to know them.

I really enjoyed this book and read through it quickly.

IMG_8180Wine Pairing: Pasqua Pino Grigio Delle Venezie

This is a light, everyday wine, which I thought would pair nicely with this book about everyday people. It is crisp and fresh, just right for this late September weather too (we are still getting highs in the 90s here in Texas-ugh!). You can pick this up at a grocery store for about $10.


*As an aside, I really do miss having a Trader Joe’s nearby! It was my go-to wine spot and I’ve yet to find anything that comes close. We only have H.E.B. grocery stores here and while everyone in Texas seems to love them, I’m just not on board. You really can’t beat Trader Joe’s seasonal items and their cheap, delicious wines!

The Blue Door

IMG_7520

I’ve been dying to try this place out for weeks! Buuuut being currently pregnant and with a one year old running almost running around has been kind of cramping my style. We were finally able to make it out for a date night, and of course we took Kermit with us. There are significantly less places to take him in Midland than in Birmingham (especially in this heat!) so he’s been feeling kind of left out lately. The Blue Door is 100% dog friendly and we were so happy we got to bring him along!

IMG_7318The Blue Door is a bar located off Garfield Street in Midland (same area as Brew Street Bakery). It has Tuesday-Saturday happy hour from 4-7 with specials on wine, beer, and cocktails, as well as Girls Night Out drink specials on Thursdays. (They are closed on Sundays and Mondays.) The Blue Door has a patio in back with cute lights and where dogs are more than welcome! Their menu is appetizers (flat breads, dips, etc). While we didn’t order any food, I was pleasantly surprised to receive complimentary pretzels and warm nuts after we got our drinks. Phil got an Old Fashioned, and I just got some sparkling water-made a bit more fancy with a nice glass, environmentally friendly straw, and a lime. It was nice to feel a bit festive on a night out even when I wasn’t drinking.


The patio has waiter service and Kermit was immediately welcomed. Our server brought him water, and there is also a self-serve water station outside so I could refill for him as needed. Kermit spent most of his time trying to finagle foods from the table behind us, and getting pets from the wait staff. They even had treats for him!

We had a great night out at The Blue Door and I’m excited to go back when I can enjoy some of their cocktails for myself!

L&M Leggings

get active 2

So I realized it’s been way too long since I’ve done an “I Love It” post. One of the things that I love most, that I wear so often I barely even think about-leggings. Yes, leggings as pants, leggings as everything.

L&M Company is a Richmond based small business that sells absolutely the most comfortable leggings that I’ve ever owned. They have three styles: the Original Staple, the Signature Comfort, and the Get Active. You need all three.

stapleL&M Company launched when I was newly postpartum with my first child. I still hadn’t lost the baby weight and was feeling a bit self conscious. These leggings saved me. The Staple is a thicker legging that is meant to be worn as part of a “going out” outfit, and can be dressed up for a night out, or dressed down to be more casual for work or other outings. They suck your stomach in and the waist actually stays up all day without the awkward “pull n hitch”. When nothing else fit me, these leggings made me feel confident to go out on dates with my husband, or for a girls night, while feeling a bit like the “old me.”

comfort
So you can’t really see the leggings here, but I’m too comfy!

The Signature Comfort is the definition of comfortable. I have two pairs of these, and am debating getting a third, because they just released a new color! These leggings also stay up without having to fiddle and pull on them all day. They are thiner than the Staple, but are full coverage-no see through panties here! These leggings are super soft and super easy to move in. I could wear them all day long without feeling like I was in tight leggings. They easily go from lounging around the house to going out for a drink at a local brewery with Kermit. (Or maybe that’s just me, but you get the idea.)

get activeThe Get Active is the last of the collection that I bought. I felt that I had enough workout leggings, I even wore the Signature Comfort to yoga sometimes, so why did I need to get another pair? After a few months of wearing my Comfort and Staple leggings and having them hold up so well to wear I figured I should just go ahead and round out my collection. They are breathable without being flimsy and I can move easily in them. Once again, these stay up throughout your workout. I also really like the blue color.

I really love all of these leggings, and I love the fact that this is a local (to Richmond) company. I’m all about supporting local business, whether that be the Midland Farmer’s Market, or something more local to my home state. I’m currently almost 20 weeks pregnant again and these leggings are still my favorites. I’ve retired the Staple (for now) but the Signature Comfort is just as comfy as ever, and the Get Active is one of the only pairs of non-maternity leggings I have that I can wear for long periods without feeling like my belly is getting squeezed. I highly recommend this brand and I’m so excited to see what they come out with next!

Firefly Lane/Fly Away

72193374-69fb-4c6c-bbeb-06112c26345c

I’m doing a joint review of two books because these go together. Ever since I first read The Nightingale I’ve been a fan of Kristin Hannah (see Winter Garden). I love her descriptive settings and how she creates characters that feel real. Firefly Lane and Fly Away are less heavy than The Nightingale, but they were both a great read, especially for the summer months.

6d1fb4eb-9002-44f6-95e1-b26f07fef3be
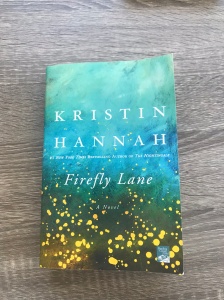
Firefly Lane is the first book of the two. This tells the story of two girls, Kate and Tully, who have grown up together as best friends. It starts in the 1970s and continues through to present time, shifting the point of view between each girl as the story goes on. I liked how the reader could see how their friendship evolved over time and how different events shaped each of their lives. Tully and Kate are basically inseparable as children and grow up to go to the same college, and then become roommates as they work together at a newspaper. Tully is more outgoing and fashionable. She knows what she wants and never hesitates to go for it at full speed. Kate takes more of a backseat to Tully. She is more reserved, but is smart and reliable. Together, Tully and Kate navigate the world of journalism, when eventually Kate gets married, starts a family, and becomes a stay at home mom, while Tully continues to work hard and climb the ladder of success. This, along with other events, shifts the dynamic of their friendship.

Firefly Lane is more about character dynamic than one main plot as the driving force. Seeing the girls grow up together and their friendship resonated with me, and I remained interested in their story. There is definitely some drama in the book which keeps it interesting, but since it covers such a wide span of time, the problems the girls face change as they grow older. Sometimes, I felt that Hannah spent a little bit too much time explaining just how big the girls’s hair was in the 80s, but I did appreciate how she made it obvious what time period they were in. I also felt like the personality traits of Tully and Kate were occasionally a bit stereotypical-the “good girl” who has a loving family, is quiet but hardworking and reliable, is best friends with the “wild girl” who doesn’t have a stable home life, is loud and sometimes reckless, but works hard to ultimately be successful-but looking past that I could find myself relating to them and to their friendship. This kept me invested.

fly awayFly Away is the second novel in this two part series. You really probably could read each of them as a stand alone, but Firefly Lane gives the true background on Tully and Kate which enhances Fly Away.

I feel like this is copping out of giving an actual review, but I really don’t want to say too much about this book so that I don’t ruin what happens in Firefly Lane. Fly Away picks up soon after Firefly Lane ends. It continues to follow the Tully, Kate, and their families. This book switches point of view between different characters, including Kate’s daughter, which I found interesting. It also goes back and forth between the past and present to meld the story together, which I enjoyed. The reader gets to see the “aftermath” of the events of Firefly Lane. This is something that readers don’t usually get after finishing a loved book, so I was glad that there is a sequel. Hannah didn’t write this until a few years after Firefly Lane, so some faithful readers had to wait a long time. (I’m glad I didn’t have to!) Characters that we didn’t get to know or see much of in the first book come back in this one for a larger role.

Of the two, I liked Firefly Lane more, but I enjoyed both. They are both fairly easy reads that I was able to get sucked into.

0ed61641-5d29-46f5-8d67-8a08774e18f6
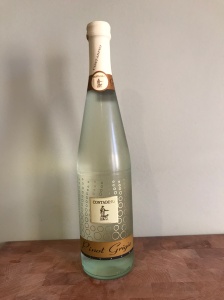
Wine Pairing: Trader Joe’s Contadino Pino Grigio

This wine is light and crisp. It’s not sweet, but it is sparkling, which is different for a Pino Grigio. It’s the perfect wine for sipping outside while reading an easy summer book. You can find it at Trader Joe’s for about $6.

I discovered this wine a few years ago. I was a 5th grade teacher and the school year had recently ended, so of course I was wine shopping at Trader Joe’s. I ran into a parent of a child who had been in my class. We chatted and she immediately recommended this wine, saying it was her go-to in the summer. I can never turn down a wine recommendation, especially a sparkling, so I got a bottle and never went back.

Painting Shutters

a56ac9be-797e-454f-9aac-8748710add90

We loved our house pretty much right away, but there were definitely things about it that I wanted to change. The shutters used to be crimson. At first I didn’t hate it, but then we did some landscaping and added some white rocks, and then it was like every day that went by I hated them more and more. They clashed with the white and were just plain ugly. We looked into replacing the shutters entirely with wooden ones like this, but it just seemed too expensive and since this isn’t going to be our forever home we don’t want to dump too much money into it.

So I figured painting them would be the easiest and cheapest way to go. It only took a few days (mainly because I had to allow the paint to dry) and it gave our whole house a makeover.

IMG_6018
Our house before.

Supplies:

  • screwdriver
  • spray paint
  • sponge
  • soap
  • step stool

What I Did:

We have plain vinyl shutters, nothing fancy. First, I took off all of our shutters. I really think that they weren’t originally put on correctly because they were all just screwed in between the bricks with screws and had no shutter fasteners. But, again, since this isn’t our forever home and since it looked fine how it was, I decided to just go with it. Taking them down really required some manpower, especially since some of the screws had been painted over in that same ugly crimson.

0bb9caf6-b8d8-4e11-a068-a4ea0f61f088
All washed and sitting out to dry!

Next, I took the shutters out back and washed them well with soap and water. I used Murphy’s soap because it’s just what we had. Make sure you scrub them with a sponge to really get the dirt off-just hosing them down won’t clean them properly. I focused on washing the side with paint and took less care washing the side that faces the house. I left them outside to dry.

IMG_6005
I found this paint at Target and Home Depot for about $5 a can. I used 4 cans, and part of a 5th.

The next day, I spray painted them. You could also probably paint them with regular paint and a brush, but spray paint is much quicker, and you don’t have to worry about brush strokes. I covered my step stool (also used to help me reach the shutters while taking them down) with an old blanket and set a shutter on top of it. I put the paint about 6 inches from the shutters and made sure to get around all the sides and in each direction so that it had full coverage.

Something to take note of with paint: don’t paint your shutters any color that’s darker than the original color. If it’s too dark then it will naturally draw more heat than the plastic was intended in it’s original color and it could warp.

The directions said to paint the second coat within an hour or after 24 hours, so I threw on two coats within an hour. Two of our shutters had cracks in them. I chose not to replace them because they aren’t that noticeable and we just wanted a quick, cheap, way to brighten our house. After I painted the second coat I let them dry for a full day before putting them back up.

We decided to just put up the shutters the way they were originally, instead of getting shutter fasteners. If you do have shutter fasteners, or decide to get some, here are instructions on how to install them. Some of the originally screws were broken, and they were all painted crimson, so we went to Home Depot and picked up the same size screws to use. I thought about painting them white as well, but decided against it once the shutters were up-they looked fine how they were.

And there you have it! This really was a quick and easy project. The hardest part for me was screwing and unscrewing the shutters. I think this was mainly due to them not being installed properly, but I recruited my husband to help and he was able to get them off and then back up again. They definitely give our house a more cohesive look and add to the curb appeal. I love how they match our landscaping and stand out distinctively against the gray brick. Good luck in your shutter painting endeavors!

Brew Street Bakery

c34ec5b0-ff50-4ebe-883a-b2ec3f014440

Kermit and I discovered a gem in Midland! That gem is Brew Street Bakery. It is a coffee shop and bakery that also offers a lunch and dinner menu (their flatbreads are to die for) and brunch on the weekends. Brew Street is ultimately a coffee shop, but they serve wine and beer, which makes it an excellent, versatile place for your caffeine and alcohol needs.

Dogs are not allowed inside (like most places) however, there is a large patio out back where they are welcome. Since it’s so hot here in the summer we’ve only been once for brunch, but in the evenings it’s nice enough to be outside.

90020db2-8deb-4bd5-ada7-d03fa84d741e
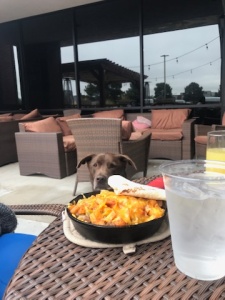
We went for Mother’s Day and I got an egg scramble with cheese and potatoes that a lucky little boy was able to sample. Overall, Brew Street is affordable with good food and drinks. It’s perfect for a quick brunch or coffee date, but it’s also nice to go in the evenings and wine down with a drink. When he’s not begging for food, Kermit loves to lay by the entrance and judge other patrons.

This place is great for a casual night (or morning) out and I love that we found somewhere fairly close where we can bring Kerm. Our biggest challenge still remains bringing him out with us in the summer heat, so we’re hoping there will be an indoor, air conditioned option coming soon. (Bham breweries we miss you!)

Miss American Pie

IMG_6010

Miss American Pie by Margaret Sartor is one of my all time favorite books. It’s my go-to for an easy summer read. Miss American Pie is a bit different than my usual favorite because it’s a memoir. It’s based on the author’s life growing up in Louisiana in the 1970s. Sartor uses her old diary entries to craft a narrative about life from the point of view of a girl growing into a young woman.

Miss American Pie starts when Sartor is about 12 years old, and ends as she finishes up high school. I love that as readers we get to see first hand how the writing changes as she grows up. You can definitely tell that the perspectives are from a young person-because they are. I love reading her authentic thoughts while also getting a glimpse into how parts of life were different in the 70s.

I feel like this book is completely relatable to anyone who has grown up. Sartor writes about body image, her relationship with God and her experiences in the Bible Belt, friendships, and, of course, boys. Though the time period is different, the situations she dealt with are very relevant in 2019-wondering if a boy will ever call, analyzing why a good friend said something hurtful, questioning your place in the world.

I love how this book illustrates how growing up is a universal phenomenon and we really aren’t all that different. Many of the teenage wisdoms Sartor writes are similar to my own diaries from my high school years.

IMG_6009Wine Pairing: Bull Run Chardonnay

This book is like coming home to me and I end up reading it almost every summer. It’s a quick read and parts of it always stick with me.

I chose this wine because it also feels like home to me. Bull Run Winery is next to the Manassas Battlefield Park. It has amazing wines and gorgeous views. There are pieces of history from the Civil War that you can view in the tasting room, an outdoor patio area, and plenty of picnic space. This is my favorite winery in Virginia and I definitely miss being so close. I ordered several bottles of my favorite wine to enjoy here in west Texas.

This chardonnay is very oaky-I love love love an oaky chardonnay. It’s a buttery, rich wine. I love it in the summer (and fall, and winter, and spring). Cheers!

Tortilla Soup

4003d872-709b-4230-a6e1-e058b40cf59f

So it’s summer which means it’s definitely not soup season-but soups are just soooo easy to make, and can be saved for great leftovers. I made some tortilla soup and wanted to share as a simple, delicious weekday dinner that our family loved!

Tortilla soup is pretty standard, but, like most any soup, you can easily alter it to fit what you have in your own kitchen. I used this recipe as a baseline, but there are plenty of other that are easily google-able.

taco sauce
Photo Credit

I was originally planing to make chicken tacos for dinner, so I had some chicken going in the crock pot. I covered two chicken breasts with taco seasoning. You can use any kind but this brand is my absolute favorite. You can get it from most grocery stores, Target, and (obviously) Amazon. (Their fajita mix is amazing too.) We had had Chipotle the night before and had leftover salsa (medium spicy) so I just dumped that over the chicken as well. I cooked it on low for about 6 hours.

Once I decided I wanted to do tortilla soup, I checked the pantry to make sure we had everything. Since most of the ingredients are pretty standard, we did!

Ingredients:

  • jalapenos (we only had canned so I just used that)
  • one onion
  • three cloves garlic
  • 1 teaspoon cumin
  • 1 can black beans
  • 1 can corn
  • 1 can diced tomatoes with peppers
  • tomato paste
  • olive oil
  • chicken broth
  • shredded chicken

Steps:

5c9b42d1-da71-468f-9d3a-2d7f72d51edbFirst, while the chicken was still in the crock pot, I chopped the onion, garlic, and jalapenos, and sauteed them in olive oil in a large soup pot. Then I just dumped in the rest of the ingredients. I drained the canned corn, tomatoes, and black beans. The original recipe calls for crushed tomatoes but I didn’t have any, instead, I used a small can of tomato paste and then filled the can with water to dilute it. The original recipe calls for 3 cups of chicken broth, which I first poured in.

Next, I shredded the salsa chicken in the crock pot and added about 2/3 of it to the soup. I also had to add about two more cups of chicken broth-but you can add more or less to make your soup thicker or thinner. I simmered the soup for about 40 minutes until it was all cooked through and warmed.

To top it off, I added shredded cheese and some tortilla chips. If you’re feeling really fancy, you can make your own tortillas by cutting flour (or corn) tortillas thin and frying them in oil. You can also add more or less of any ingredients, and top it off with cilantro, other spices, lime, avocado, sour cream-pretty much anything you want. You can also change up the chicken for a different protein, or even avoid it altogether and add extra beans, etc.

5e41706d-aef8-45b9-b4dc-a6c14b18ad07I love tortilla soup because it’s so easy and versatile. The taco sauce/salsa marinated chicken made it extra spicy which I just love. I made so much that we were able to enjoy this for about 5 days for lunch. I honestly think it’s almost even better as leftovers. The veggies, spicy chicken, cheese, and crunch of the chips just make it the perfect meal, even our 10 month old loved it!

So turn up the AC, and go ahead and make some hot soup this summer!

Installing Flooring

We recently moved our family to Texas for my husband’s job. We found a house that we loved and closed on it fairly quickly. While the house and neighborhood are great (location is key!) some of the aesthetics of the house definitely weren’t what we wanted. We had to paint (every single bedroom, a bathroom, and part of the main room), move a door, redo some electrical work, and put down better flooring in the master bedroom.

All of this, as you can imagine, was pretty expensive. We didn’t want to break the bank so soon after moving in, so we hired professionals for the electrical work (not about to mess around with stuff that can kill us), and found a good painter/handyman for an affordable price. With the amount of rooms we needed to paint, plus a 9 month old, plus Kermit, I just couldn’t do it myself this time.

The original contractors we had give an estimate to do the flooring were so expensive that I actually got mad and decided to just do the flooring my damn self. So, that’s what I did. This was definitely the most ambitious task that I’ve ever attempted, and I also ended up getting a bit of help from our Jack-of-all-trades painter, and my dad who helps build houses for Habitat for Humanity. I ended up doing most of the heavy lifting though, and the floors turned out pretty nice!

Flooring is definitely doable by a novice, but it was also definitely more difficult than I expected, so know that going in, and be prepared that you will make mistakes and it might take longer than you think.

What You Need:

  • crow bar (to pry up old flooring)
  • Dremel Saw
  • gloves
  • flooring kit
  • rubber mallet
  • moisture barrier
  • tape measure

What I Did:

dd9471d9-15e7-4ac5-821b-b623ab3c9417
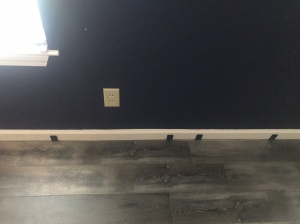
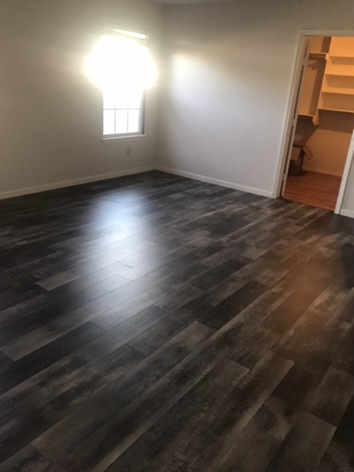
Our floors were originally a light wood color, but they had warped over time and it had gotten really bad on one spot in the room. The walls were also a dark purple. We knew we definitely wanted to paint the walls, and figured since the floor was warped we might as well replace it before we moved all of our furniture into the house.

We went to Home Depot and found the flooring we wanted. We chose Crestwood Gray and it was only $1.50 per square foot. Our new master is pretty big (almost 300 square feet) so we ended up needing to buy 19 cases of flooring. Home Depot’s website is great for figuring out how much you need. You just enter in the dimensions of your room and it tells you how many cases to buy and how much it will cost. The general rule is you want about 10% more than you’d need for the exact square footage of your room so that you have enough for mistakes and other waste when cutting the boards (Home Depot’s website automatically factors this in).

Once we had the flooring we wanted, I started ripping up the old flooring. I started at the warped section and used the crowbar to pry it up. Once I got up the first section, the rest was pretty easy. Be careful of the baseboards, you don’t want to damage them. You should also wear gloves so you don’t cut your hands.


0e0fac6b-c94a-40e1-b639-504705fbc780
Concrete, ready for flooring!

Once all the flooring was up, we had to put down the moisture barrier. This keeps moisture out of the flooring so that it won’t warp. After taking up the old flooring we saw that the previous owners didn’t do this, which explained why the floors were so warped. I followed the directions and unrolled the barrier down on the concrete. There is a sticky strip on the side of the barriers so they stick to each other; once they are laid down you need to stick them together. I also taped the ends down around the walls because they kept coming up after I had cut them to size. This was the most frustrating part for me because it took some adjusting for it to lay flat and straight.


7e3ab022-eb0b-40af-9a4c-b0ee5f2866a0
spacers

Once the barrier was down came the real work: laying the flooring. The first row was the hardest. You need to set up spacers (they come in the flooring kit) around the edges of the wall. The first row has three edges touching a wall, so it’s a lot of spacers at first. Our walls weren’t totally even so some of the spacers were really tight while some were much looser. I just went with it. I used the 1/4 inch spacers. Spacers are important because the flooring will swell with humidity and you need to leave room for it to do so.

The flooring has edges all around it so that each piece can snap into place. The directions told me to cut off the edge lengthwise on the first row, which is what I did, but looking back, it probably wasn’t necessary. The width of your room is probably not going to come out to an exact number of flooring pieces. Our room was 4 full pieces, plus a little bit of a fifth piece, wide-so there would be an extra bit left at the end. I tried to start with a full flooring piece, then cut the last piece at the end. This took lots of measuring, and trial and error. When you cut the flooring, you need to make sure that the edge you cut is the edge that is going to go up against the wall. Since each flooring piece has edges around it to snap it, once you cut it to fit the width of your room, you end up cutting an edge off. If you cut off the wrong edge, it won’t fit with the flooring next to it. I was using a jigsaw to cut the flooring pieces. This worked, but wasn’t the best option. A Dremel saw is best because it only cuts in straight lines, which is what you need when doing flooring.

c58e6093-42ef-4323-839e-8fc1a378ec58
coming along

As I went down through the room, it got easier and I found a rhythm. I just went row by row, snapping the pieces in and cutting the edges. I continued to put the spacers at each wall. You want the ends of the flooring pieces to be staggered by each row so that it’s more secure. I would start every other row with a full piece, and every row in between those with a half piece. You really aren’t supposed to have pieces of flooring that are less than about a foot long, but sometimes I just had to have a smaller piece to fit in, and it ended up being fine. Going around doors was a bit hard, and you should try to get as close to the edge as possible. I was kind of farther away at some points and had to cut smaller pieces to cover up the concrete.

The very last row needs to be cut lengthwise to fit (unless your room happens to fit the flooring exactly). You snap it in place and use the tool in the flooring kit to pull the flooring secure.

Once it was all done I was proud of my work, but exhausted. It took me about 2.5 days to finish everything. The first day was the hardest since I was just figuring it all out, but the second day passed quickly.

By the time it came to finish it all up, I was exhausted and a bit overwhelmed. We asked our painter, if he could do the final touches and, luckily, he said yes. The spacers left about 1/4 inch around the flooring. So that space needed to be covered. We bought quarter round from Home Depot, and had our painter install it around the edges of our room. Since he was already painting the trim, he just painted it white along with the baseboards.

Lastly, the areas around the doors to the hallway, bathroom, and closet weren’t finished. My dad came to the rescue here. We had bought some T-molding to cover the space between the flooring in the bedroom and the flooring in the hallway, bathroom, and closet. My dad cut it to size and glued it in.

While I’m not totally sure I’ll be installing flooring again any time soon, I’m definitely glad that we ended up going (mostly) DIY for this project. Bottom line: flooring is a big task, but it’s doable, so don’t be scared.

fc38c736-52a3-4188-9ce3-7713c4b74f0a
The final look