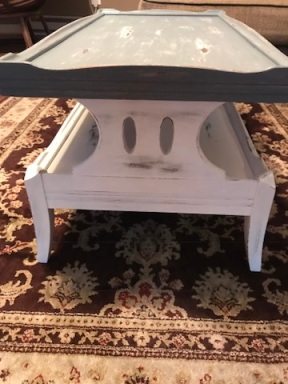
So when I first moved down to Birmingham to be with Phil we had a small one bedroom apartment crammed with a mishmash of furniture that both of us had received as hand me downs from our families (thanks, Mom!). When we moved into our house, not only did we have more space to fill, but I wanted our house to have more of a style to it than just old college furniture. We had also just bought a house, soooo new furniture wasn’t exactly in the budget. After painting the kitchen cabinets, I was riding high on the I can do (or paint!) anything train. So I turned immediately toward Phil’s old coffee table. Brown and plain and kind of beat up from year of use, aaaaaand also when Kermit was a puppy and chewed some of the furniture.
Nothing special, and not terrible. So I figured I could refurbish it to give it some new life. I liked the look of distressed, two tone furniture so I figured I’d try that out. My process was similar to cabinet painting, but with lower stakes.
Supplies:
Good quality paintbrushes, small and large
Paint (I used my white cabinet paint and gray paint, you probably don’t have to have as high quality Benjamin Moore paint for this, but since I had some I used it.)
Primer (I used the Kilz primer I already had)
Finish: I chose clear satin but almost think it was a shade too glossy. You probably could also go with eggshell or even matte.
Sandpaper: 150 grit and 220 grit
Tack cloth: (It’s like mesh cloth and feels like there is honey on it, so it’s kinda sticky, you can find it at Home Depot, or any other store like that.)
Regular cloth/duster
Steps:
1. Set up your paint section. I put down and old comforter and set the table on top of it.
2. Use 150 grit sandpaper and sand the whole table down to get the shine off. I sanded extra where Kermit’s puppy teeth had chewed into the bottom to try to smooth it out.
3. Vacuum the table and wipe down with duster to get all the dust and sand residue off.
4. Use tack cloth to carefully get the rest of the dust particles off.
5. Prime your table. I used Kilz primer all over the table. Since our table has smaller details on parts of it I alternated using the big and small brushes.
6. WAIT at LEAST 2 hours. (I usually waited overnight.)
7. Use 220 grit sand paper to lightly sand the table.
8. Wipe table with duster and then with tack cloth to make sure it’s totally clean.
9. Paint! First coat. I did white on the bottom of the table, and gray on the top.
10. WAIT AT LEAST 16 HOURS
11. Use 220 grit sandpaper to sand over first coat, wipe with cloth, wipe with tack cloth, paint second coat.
10. WAIT 16 HOURS
11. Use 220 grit sandpaper to sand over second coat, wipe with cloth, wipe with tack cloth, paint third and final coat.
12. WAIT 16 HOURS
This next part scared me, but just go for it!
15. Using your 150 grit sand paper, roughly sand your table all over. Try to pick spots that would “naturally” be worn down, like corners or edges. I kind of did it all over focusing on edges and a bit on the top. You can sand as much or as little as you like.
13. Vacuum, wipe with cloth, wipe with tack cloth, paint your satin finish. You may need to wait again and then paint a second coat of finish depending on what kind you buy.
And now you have a brand “new” table!
Later on, I found a cheap rug from Home Depot and some (not as cheap) pillow covers from Pottery Barn to give the room a full makeover. Not super fancy, but definitely updated, and more our style.
What are your tips for updating a room? Leave them in the comments!


Coffee table looks fantastic! Great job!!
LikeLike